It’s time for the big reveal of the second of Kelly Cottage’s 2021 series of extreme(-ly low-budget) makeovers: the laundry room redo!
In this post, I’ll go back over the main project objectives, a list of steps I took, andddddd, drumrolllll… the bottom line: how I came in budget-wise. Oh! And I’ll show you the PICTURES!
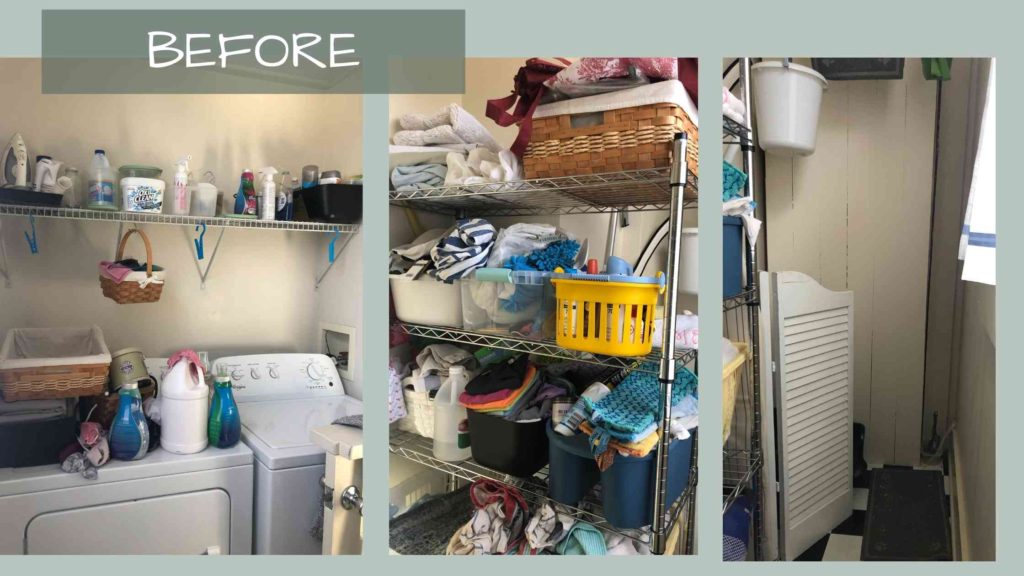
In case you forgot… The Laundry Room Redo Objectives–
- define functions of the room (previous post established them as laundry processing center, cat litter area, & cleaning supply storage plus I wanted to add on a drop place for reusable grocery bags)
- reduce stuff in the room
- replace wire shelves
- better use space
- improve the aesthetic
How I went about meeting those objectives–
I’ll tell which of the above objectives each step helped to meet (in parentheses).
Reduction of Stuff (1,2,4,5)
This is the first and probably most important step I took. As you can see, it helps with 4 out of 5 objectives! I explained most of my thought process in last post, but the pictures show the difference the purge made. And it took less time than most other tasks!

Wall & Trim Repair (5)
Lots of spackle, wood filler, and caulk came into play here. Very little shows up in pictures, but I made lots of much-needed improvements overall in the walls and trim.
Paint (5)
Also it barely shows in pictures, but I switched from an Almond color on trim and walls to a decorator flat white (had a partial can in the basement). And I had a quart of Bright White (not sure what brand color that is–mixed in Benjamin Moore Regal semi-gloss base) on the trim and new shelves.
Shelves (1,3,4,5)
New shelves over machines
The shelves needed replacing NOT JUST because I hated the way they looked and functioned (small stuff falls over on them), but also because they had slipped and sagged at times, causing gouges in the sheetrock on the sides, and leaving me wondering when they might fall apart. They were also too tall even for a tall family to have to access heavy stuff like detergent.

I bought Romanian (not sure why they had to come all the way from Romania…?) pine edge-glued boards for shelf strength and to save money (paintable boards are cheaper than solid, stainable boards, and lumber right now is HIGH!). I cut down 1×2’s I found in the garage for facing, to strengthen and beef up the look of the shelves.
Wire free-standing shelf modification
In order to make space for the litter box, I removed the upper and lower shelves from the freestanding unit (and actually added them to my pantry shelving to increase storage there) so that the shelves and the litter box could occupy the back corner of the room together, opening up the floor space.

Containerizing (1, 4,5)
I shopped my house (and container stash) to switch out to more coordinated colors and create all needed storage.

Accessorizing shelves (1,5)
And I did the same for the shelves. I had plenty of baskets and containers that would work to repurpose. I minimized items on the shelves over the machines to just a few essentials. And I used glass containers to get rid of visual (packaging label) noise.
The large basket holds cleaning rags. The top right basket holds clean masks, and the lower left basket holds wool dryer balls. And the old aluminum pot on the lower right holds the measuring cups for detergents plus a rag to wipe the bottle, if needed. (My Granny used the Aluminum pot to hold her clothespins when she hung her wash on the line–it’s a treasured keepsake that makes me smile, and all the more because it’s put to good use,)

Curtains (5)

Cafe curtains
I sewed these from younger daughter’s old room curtains.
Concealing curtains
These were a pair of panels from older daughter’s old bedroom curtains that I had to hem. You may ask why I would want to conceal storage in a utilitarian room like the laundry room, especially after going to the trouble to make it look nicer. But the Dutch door you hopefully noted in the above picture leaves the room exposed to THE BACK FOYER (you may remember from the previous “redo!”) at all times. Plus the litter box and accessories are hard to disguise. (I may swap out the red tractor supply bucket and better camouflage the poop bags even WITH the curtain there, now that I’ve thought more about it, though…)
Spray Painting (5)
I spray-painted my existing laundry baskets to match the decor–using plastic fusion paint. The jury is still out on whether or not it worked well. I also painted a wooden dollar store tray (I already had) to incorporate a little of the gray on the shelving over the machines.
Re-covering ironing board (5)
I found a nice cover at a bargain store called “Dirt Cheap.” hahahahahaha! My kind of store, for sure.
Still on the punch list…
–Strip and repaint windows. The specially-ordered stripping agent came in, but must be used within 24 hours of mixing the powder and gel components. It’s quite expensive, so it will have to be strategically partially mixed, and then I may work on two rooms at once. I wasn’t prepared to get involved with windows from any other room yet.
–Replace floor tiles (only about half need replacing). I wanted to have all other jobs complete before tackling the floor. I still have a few to replace in foyer as well. Sounds like a Saturday job.
–Fashion a hanger for the ironing board to get it off the floor.
And a note–
I chose not to change out the fluorescent light even though it’s not a thing of beauty. The room gets plenty of light during the daytime, so I hardly ever turn it on, and honestly if I’m working in there at night, I want all the light I can get, so the fluorescent fixture fits the bill. Not Pinterest-worthy, but practical. 🤓
Costs
window stripping (planning to use on at LEAST two different windows so 1/2 the total cost of the bucket) – $26.58
curtains (bought at bargain store, but didn’t use after all) – $4.39
ironing board cover – $2.20
thread (for hemming grey curtains) – $2.73
uprights (for double track shelf brackets) – $28.44
lumber – $31.06
plastic fusion spray paint – $5.44
replacement floor tiles – $8.78
FOR A GRAND TOTAL of……………. $109.62
I did go over my $100 per room budget and well over my ideal ($50) budget for smaller rooms (to have more to spend on the bigger ones).
Perhaps if the window stripper stretches beyond two rooms-worth, I may still be under the wire retroactively. But I have to strip several windows first to find out!
However, I feel like I got lots of bang for my buck, especially when you consider all that I didn’t have to spend money on from the list below! AND since the foyer was only $36.41, I’m still at only $146.03 of $200.00 set aside for two rooms. I’m at least forewarned now about the crazy current cost of lumber and can plan accordingly.
What I Already Had on Hand
brackets
1×2’s
paint
caulk
storage containers
long curtains (had to hem)
cafe curtains (had to cut and sew new rod pocket)
spackle
wood filler
baskets
plants
bottles
jars
wooden tray for detergents (and plastic protective liner)
nails and screws needed for shelf construction and installation
THE BIG REVEAL


I’m much happier with the results this week than I was with the partial progress last week. It was a little discouraging to do so much work, and for the pictures to convey so little. Also, sometimes in the middle of a project, it gets hard to see your way clear to the end. If you’re like me, you begin to doubt 1) you’ll ever finish, and 2) you’ll be pleased with the results if you ever DO finish.
I’m SO much happier with the functionality AND the streamlined appearance of the laundry room. Not to even mention the extra space to move around. I will certainly have one less reason to procrastinate about the laundry!
Lastly
I hope you’ve enjoyed the pictures and can make some sense of my process. And most of all, I hope you can take away some nugget of inspiration or encouragement you can put to work over at your place, even if it’s only something you learned NOT to do. haha!
If you have any questions or comments, please don’t be shy!
And if you are not on my e-mail list, be sure to sign up so you never miss a post. If you’re reading on a mobile device, you may have to scroll waaaaayyyy down to the bottom to get to the sign-up form. Otherwise, it should be on the sidebar. But my subscribers get EXTRA love in their inbox each week, so don’t miss out!!
Blessings,
