Welcome to the second TD redo, that is not quite to the “tah-dah” stage. All my to-do’s are not yet “to-done,” so you’re getting a progress report of the Laundry room redo, along with pictures. And hopefully some special encouragement and takeaways (if you’d like to make your laundry room (or ANY room) more functional–even if you don’t want to dive in to an involved project!
Rather than work crazy long hours into the weekend (and probably STILL have to cut corners) just to get things photo-ready, especially THIS weekend, I’m going to break it up into a two-parter. And hopefully address MOST of the rest of the punch list in time for next week’s post.
A little optimism from a non-optimist
I have decided to celebrate progress instead of bemoan my failure to fully complete the project when I intended to. That’s a win for this-here realist that my husband sometimes calls a pessimist 🤨…
Takeaway #1: celebrate any and all progress!
There’s also SO much to tell about the project for those who want the nitty gritty details, I probably would have needed to break it up into two posts ANYWAY.
Takeaway #2: reframe your so-called failures into benefits…
BEFORE BEFORE
So I took a pictures of the laundry room sometime last year after doing some 15 minute micro-organizing sessions in there. And this is how the more “ideal” before pictures look:

Real before
The picture below is how the room ACTUALLY looks most of the time. With two girls who work and go to school full-time (that work includes teaching dance for daughter #1 and working as a barista–think lots of stains–for daughter #2), not to mention casual and workout clothes for all four of us, this room gets a workout. AND NEEDS TO BE VERY STREAMLINED. Which this picture illustrates very well it is NOT.

The Laundry Room Project Objectives
I hate to say “pain points” when referring to laundry room issues, because an ugly, messy laundry room is definitely a first-world problem, but let’s just say the “challenging-areas-that-I-would-love-to-improve-upon” resulted in the following objectives:
OBJECTIVE #1: Define main function(s) of the room
The primary functions of the room are processing laundry, storing cleaning supplies, and housing the cats’ litterbox (yes, it pretty well has to happen in this room…). But there were SO MANY functions I was trying to incorporate into about 44 awkwardly chopped-up square feet. You’ll see what I mean with all the stuff catalogued below.
Items not essential to this space (or that should be housed elsewhere)
paper toweling – I’m trying to discourage/ reduce paper towel usage, so I don’t mind relocating the storage to the less-convenient basement.
pet food – we feed the cats in our large master bathroom, where it’s more convenient to store it and I have the space.
pet meds – expired meds and leftover paperwork from three years ago needed to go AND I regained a small amount of space from them.
husband’s running gear – needed sorting through, and what was left moved to our bedroom where the rest of his running gear resides.
laundry sorting baskets – left over from the days of me doing the whole family’s laundry. Nowadays the girls do their own, and I pretty much do loads straight out of mine and hubby’s hamper. Great example of a system that used to work, but that no longer serves us. Time to let it go.
a mending basket – who am I kidding? This basket becomes a storage basket for years at a time. By the time I get around to mending something or removing a stain (if I’ve left it in this basket) it’s already gone out of style! It’s just a procrastination trap.
sewing notions for mending – I relocated these to be with my larger sewing kit, which I often have to break out anyway, if I’m sewing on a button or stitching up a hole, once a decade or so.
Extra linens for bathrooms (extra rugs and shower curtains)- If storing in the bathrooms where they are used doesn’t work, I’ll just learn to live with one set, and just wash them same day that I remove them from the bathroom.
car cleaning supplies – to the garage
old sheets to use as drop cloth for painting – can be stored with paint and supplies in basement
seldom-used steam cleaning machine – don’t use it often enough for it to take up prime real-estate in a busy laundry room. To the basement.
Items actually pertaining to room’s primary functions
cleaning supplies – rags and cleaning solutions (ones pertaining to cleaning bathrooms relocated to the bathrooms)
ironing supplies – ironing board, iron, clothing steamer, starch
detergents, non-chlorine and regular bleach, stain treatments
cat litter storage bucket
cat litter box w/ accessories for clean-up
Item to actually ADD
And finally, one thing I want to add is a receptacle for shopping bags, since neither our foyer nor pantry have space for them, but they often end up piled in the foyer because none of us wants to make a trip back out to the car after unloading groceries.
OBJECTIVE #2: REDUCE THE AMOUNT OF STUFF HOUSED IN THE SMALL SPACE
Clarifying the room’s function took care of a lot of the extra stuff. But I can’t say enough how important it is to constantly be editing the “stuff” in all the rooms of your house. I don’t believe organization is ever a one-and-done proposition when you have a family whose needs are constantly changing. You have to always be thinking, “what is essential in this space vs what could/should be stored somewhere else or gotten rid of entirely?” I’m so prone to creating elaborate organizational systems that never work when multiple family members are sharing a space. Everything has to be EASY to access and put away or the systems will fall apart. I know this from lots of failed systems.
And organization is not enough. Actual REDUCTION is almost always the only way to achieve the truly streamlined, functional space we’re after. Pictures below show a vast improvement after just removing items that needed to be donated, thrown away or re-homed.
ASIDE: Minimal Mom (you should go and watch ALL of her videos on YouTube!) does a video where she talks about the idea of making things SO easy to put away that it’s more trouble to leave it out than to just go ahead and properly put it away. I think this “make it easy” mentality is key to successful systems (and ultimately a tidy home) with a family. (I’ve searched for the particular video and cannot find it, but ALL of her videos are good. You won’t be disappointed!) She also has a website here.

OBJECTIVE #3: Come up with alternative to wire shelves
The shelves are too high to reach comfortably, especially since the machines stick out underneath.
They are also not conducive to dispensing detergent or storing anything else prone to leakage or spillage.
They have slipped from time to time, so I’m always concerned with them not holding up to the weight load.
Their brackets prevent me from using the space underneath for perhaps an additional shelf.
OBJECTIVE #4: Better use the space
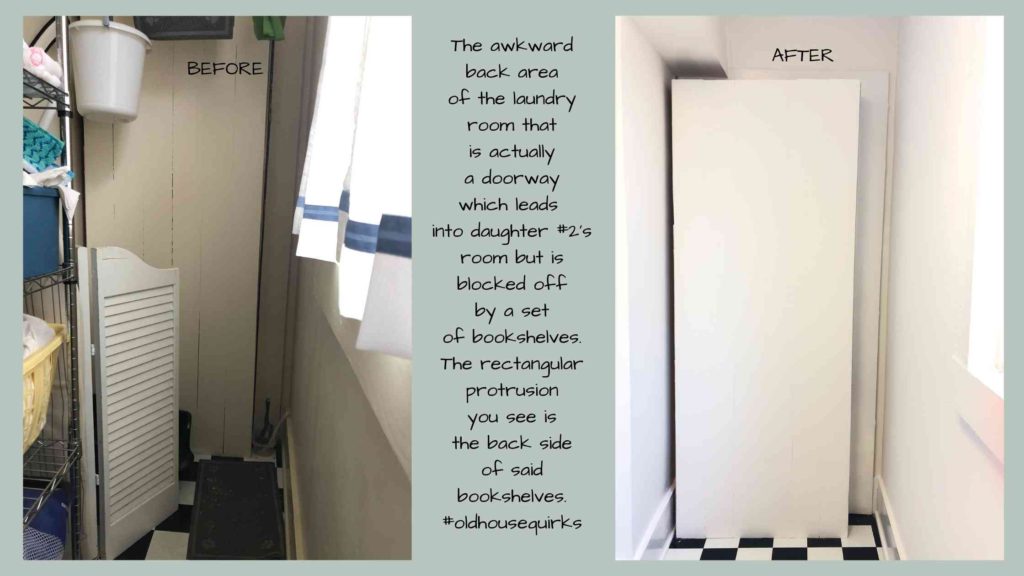
Lots of vertical wasted space over the laundry machines. But also, the awkward chopped up recess at the back of the room can be better utilized. Even though the kitties do like their privacy…
OBJECTIVE #5: Improve the aesthetic
This shouldn’t be hard, since anything would pretty much be an improvement. 😂(I can still use this emoji since I’m an uncool GenXer.) Almond walls are not working with white appliances (the previous owners who painted the almond walls had beautiful, new, red front-loading machines). It’s a hodge-podge look of items added over time, with no thought out color/design scheme, and too much visual noise with unmatched storage and cleaning products all out in the open with lots of exposed labels.
I plan to hang a curtain (still working on one I like) to conceal the bulk of the cleaning supplies and the cat’s “restroom” area.
Did i mention wire shelves?

The challenges
The challenges this go-round consisted of the following:
Working in a very claustrophobic space and being unable to remove the machines

I could barely turn around without smearing paint with an elbow or a knee when working in the narrowed back of the room. And then when I was trapped behind the machines, which I did not want to detach from their hoses, it took some creativity and acrobatics when I had to stop for a bathroom break in the middle of a painting session! Let’s just say I was finally thankful for my long legs.
Walls out of square
This created major issues with my new shelves, which were cut square. But the space against wall behind the machines was actually wider than the space OVER the machines. In other words, the corner was less than 90 degrees. Don’t get me started… Let’s just say I did a lot of sanding.
Trying to stay within budget
My ideal solution over the machines would have involved cabinets, so my storage would have been hidden. Since that would have exceeded the budget for ALL the rooms in the house (lol), my second choice was floating shelves. They are all the rage because they look so sleek. But I didn’t trust that I could build them BOTH within budget AND reliably sturdy. And function has to be first in a laundry room. There are some industrial strength brackets that are made to hold some serious weight, but they come with a pricetag that would have well exceeded the budget. So I opted for adjustable double-track shelving (the kind with uprights/standards and brackets), at least in part because I already had leftover brackets from outfitting our game closet with shelves several years ago.
Some more in-depth repairs needed
The windows could not be painted over without removing the peeling, cracking paint beneath. They were HORRIBLE. Which in a 100-year-old house means dealing with lead. So I had to order a bucket of stripper that neutralizes the lead so it can be handled and disposed of safely. I haven’t tackled that piece of the project yet. I’ll show you those grim pictures next time when I’ll hopefully have the “after” shots to soften the blow.
There was also some botched carpentry from years ago that I couldn’t live with just painting over. So I did lots of filling/sanding/spackling/sanding/caulking.

Lack of woodworking tools/confidence/experience
If I had had a circular or table saw, I could have perhaps remedied my out-of-square board problems much more quickly. I also had a challenge figuring out how to make my shelves strong enough without spending a fortune on the lumber. I ended up buying shelving that had been edge glued, and so was fairly strong and suitable not for staining but for painting. Thankfully, I had some 1×2 in my shed that I cut down with a hand saw and my miter box to face the shelves and strengthen them a little.

Overall, I’m pleased with the progress. Which is extremely optimistic of me. 😉 Stay tuned for the big reveal in next week’s post, Lord willing!
Blessings,
